Google Anlatics

Tuesday, December 17, 2024

Importing Data for Multi-Select Option Sets in MS CRM using Excel Online

Importing data into multi-select option sets in Microsoft Dynamics CRM can be challenging when using the standard data import functionality. The step-by-step guide below will help you successfully import data using the Excel Online out-of-the-box (OOB) functionality while avoiding common issues

Why Use a Template for Data Import?

Multi-select option sets allow you to assign multiple values to a single field in CRM. However, this flexibility comes with a challenge: ensuring data consistency during imports. Using a predefined blank template ensures the proper structure and formatting of your data.

Step 1: Use the Blank View Template

To make importing data simpler, you could create a special blank view template designed for data import. Here’s what you need to know:

  1. What Is the Blank View?
     This CRM view is a predefined structure with all the necessary columns for data import, but no data filled in.
  2. Why Keep It Blank?
     It’s good to leave this view empty so it serves as a clean template. If populated, it may display existing data, defeating its purpose.

Step 2: Export the Template

  1. Open the blank view in MS CRM.
  2. Export the view to Excel. This exported file becomes your working template for data import.

💡 Tip: Always double-check that the view is blank before exporting it.

Step 3: Fill in the Template

Once you have the template:

  1. Open the exported Excel file on your computer.
  2. Carefully enter the data you wish to import, ensuring all fields match the required format.
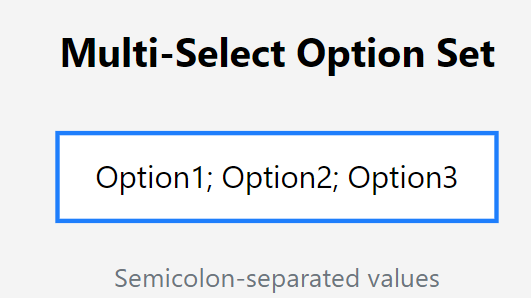
  3. For multi-select option sets, separate multiple values with a semicolon (;). For example:
Option1; Option2; Option3

Pro Tip: Accuracy is key. Mistakes in formatting may cause import errors.
Step 4: Open Excel Online in CRM

Back in CRM, follow these steps:

  1. Navigate to the same blank view you used earlier.
  2. Click the three dots (···) in the toolbar, then select Open in Excel Online.

This will allow you to edit the data directly in the CRM environment.

Step 5: Copy and Paste Your Data

  1. Open your completed Excel template.
  2. Copy the filled data from your file.
  3. Paste it into the Excel Online sheet opened from CRM.

⚠️ Important: Use a semicolon (;) as the separator for multi-select option sets. If any other delimiter is used, the import process will fail.

Step 6: Save and Track Progress

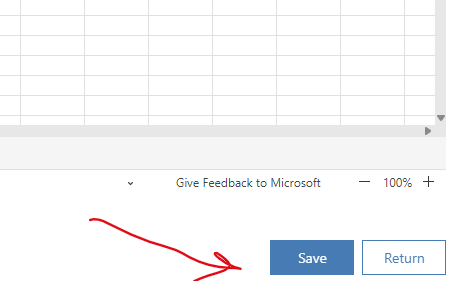
  1. Once the data is pasted, save your changes in Excel Online.
  2. The CRM system will automatically start the import process.
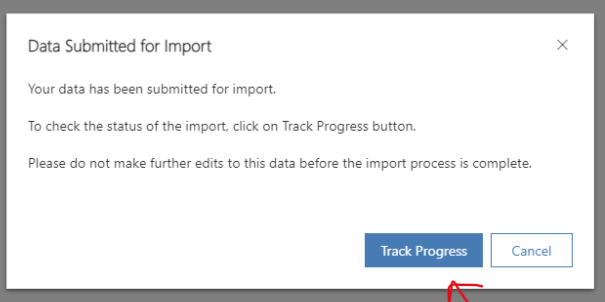
  3. Track the import progress directly in CRM by navigating to the Imports section.
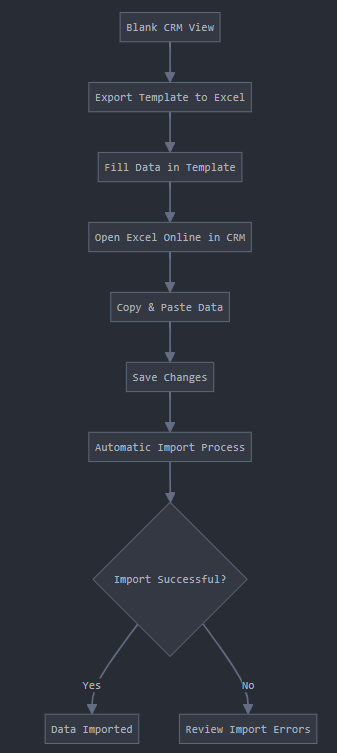
Import Process

Flowchart to visualize the entire import workflow:
Benefits of This Approach

  • Consistency: Using a blank template ensures that all required columns are present and properly formatted.
  • Accuracy: Direct edits in Excel Online minimize errors during upload.
  • Efficiency: Tracking progress in CRM helps identify and resolve issues quickly.

Always remember to use semicolons for separating values, double-check your formatting, and save your work frequently to ensure a smooth import experience.

Happy importing! 🚀

Wednesday, May 1, 2024

Applying the Single Responsibility Principle (SRP)

Applying the Single Responsibility Principle (SRP) in Report Processing

The Single Responsibility Principle (SRP) is a foundational concept in object-oriented programming that advocates for classes to have only one reason to change. This principle promotes modular, readable, and maintainable code by ensuring that each class or module encapsulates only one responsibility or behavior.

Example Scenario

In our scenario, we have a reporting system responsible for processing various report items asynchronously. To uphold the SRP, we aim to refactor our report processing logic into distinct components that each fulfill a specific responsibility, such as data encapsulation, processing orchestration, and logging.

Implementation

1. ReportItem Class

public class ReportItem
{
    public Guid Id { get; set; }
    public string Name { get; set; }
    public ReportItemStatus Status { get; set; }
    public string ErrorMessage { get; set; }
}

The ReportItem class represents a report item entity, encapsulating properties like IdNameStatus, and ErrorMessage. This class is solely responsible for managing data related to a report item.

2. ReportProcessor Class

public class ReportProcessor
{
    private readonly IReportService _reportService;
    private readonly ILogger _logger;

    public ReportProcessor(IReportService reportService, ILogger logger)
    {
        _reportService = reportService;
        _logger = logger;
    }

    public async Task ProcessReportItemAsync(Guid itemId)
    {
        var item = await _reportService.GetReportItemAsync(itemId);

        if (item == null || item.Status != ReportItemStatus.Pending)
        {
            _logger.LogWarning($"Report item with ID {itemId} is not available for processing.");
            return;
        }

        try
        {
            _logger.LogInformation($"Processing report item: {item.Name}");

            item.Status = ReportItemStatus.Processing;
            await _reportService.UpdateReportItemAsync(item);

            await SimulateReportProcessingAsync(item);

            item.Status = ReportItemStatus.Completed;
            await _reportService.UpdateReportItemAsync(item);

            _logger.LogInformation($"Report item processed successfully: {item.Name}");
        }
        catch (Exception ex)
        {
            item.Status = ReportItemStatus.Failed;
            item.ErrorMessage = ex.Message;
            await _reportService.UpdateReportItemAsync(item);

            _logger.LogError($"Failed to process report item: {item.Name}. Error: {ex.Message}");
        }
    }

    private async Task SimulateReportProcessingAsync(ReportItem item)
    {
        // Simulate report processing
    }
}

The ReportProcessor class is dedicated to processing report items asynchronously. It utilizes an injected IReportService for data retrieval and updates and an ILogger for logging processing outcomes and errors. This class demonstrates a clear responsibility focused on orchestrating the report processing workflow.

3. Interfaces

public interface IReportService
{
    Task<ReportItem> GetReportItemAsync(Guid itemId);
    Task UpdateReportItemAsync(ReportItem item);
}

public interface ILogger
{
    void LogInformation(string message);
    void LogWarning(string message);
    void LogError(string message);
}

Interfaces like IReportService and ILogger define contracts for interacting with report data and logging actions, respectively. Leveraging interfaces promotes loose coupling, facilitates dependency injection for enhanced testability, and enables flexibility in swapping implementations.

Conclusion

In this example, we've refactored our report processing logic to adhere to the Single Responsibility Principle (SRP). Each class (ReportItemReportProcessor) embodies a distinct responsibility, such as data encapsulation or processing orchestration. Meanwhile, interfaces (IReportServiceILogger) facilitate decoupling and abstraction, fostering maintainable and extensible code.

By applying SRP, we've established a modular and maintainable design where each component is dedicated to a specific aspect of report processing. This design approach enhances code clarity, adaptability to changing requirements, and adherence to best practices in software design and architecture. Ultimately, embracing SRP contributes to a cleaner and more manageable codebase, promoting robustness and scalability in our reporting system.

Wednesday, February 7, 2024

Unveiling the Power of Microsoft CRM Managed Solutions

In the fast-paced world of CRM and app development, Microsoft consistently shines with its innovative solutions. One standout is the Managed Solution in Microsoft CRM, a game-changer for customization and deployment. This guide dives into the details of MS CRM Managed Solutions and Solution Layers, highlighting their importance and the latest updates related to Power Apps.

Managed Solutions and Their Key Components

Managed Solutions are essential for packaging customizations and configurations, making it easier to bundle, distribute, and deploy components across different environments. Key components within Managed Solutions include:

  • Entities: Custom entities that define data structures, tailored to specific customer or industry needs.
  • Processes and Workflows: Automation tools that ensure standardized operations and boost efficiency.
  • Forms and Views: Customizable user interface elements for a seamless CRM experience.
  • Web Resources and Scripts: Enhancements for visual and functional aspects using images, scripts, and stylesheets.

Solution Layers: Structuring Customizations with Precision

Solution Layers are a core concept in Managed Solutions, providing a structured approach to customization. By organizing components into layers like Base, Sales, and Service, developers can create solutions that are easily extended, modified, or replaced without affecting core functionality.

Example Scenario

Imagine XYZ Corp implementing a Managed Solution in their CRM environment. This solution includes custom entities for tracking customer feedback, automated workflows for managing support tickets, and tailored forms for an intuitive user interface. Solution Layers help categorize these customizations, ensuring a systematic and organized deployment.

Latest Changes and Power App Integration

Microsoft's commitment to innovation has brought significant updates to Power Apps within the CRM ecosystem. Notable enhancements include:

  • Unified Interface Enhancements: Major improvements to the Unified Interface for Power Apps and Dynamics 365 applications, focusing on performance optimization and enhanced customization capabilities.
  • Dataverse Integration: Deeper integration of Dataverse, the data platform for Power Apps, streamlining data management with a unified data schema for both Power Apps and CRM customizations.
  • Power Apps Component Framework (PCF) Advancements: Empowering developers to create richer and more interactive customizations with improved capabilities and extensibility.

Updating Managed Solutions: A Step-by-Step Guide

Applying the Upgrade or Update in the Target Environment

  1. Development Environment Preparation: Open the unmanaged solution and customize components as needed.
  2. Version Incrementation: Increment version numbers when exporting the solution as a managed solution.
  3. Solution Update: Sign into Power Apps, select the target environment, and navigate to "Solutions" in the left navigation pane.
  4. Solution Action Options: Options include "Upgrade," "Stage for Upgrade," and "Update," each serving specific purposes in the update process.
  5. Post Import Actions: Decide on post-import actions, such as enabling plug-in steps and flows included in the solution.
  6. Import Confirmation: Wait for the import to complete and review the results.

Advanced Insights: Version Numbers, Component Removal, and Customization Overwrites

  • Understanding Version Numbers for Updates: A solution's version follows the major.minor.build.revision format. Updates must have higher version numbers than the parent solution.
  • Removing a Managed Component: Options include upgrading the solution in the development environment or deleting the managed solution, each serving specific use cases.
  • Overwrite Customizations Option: Use caution with the "Overwrite Customizations" option, as it can impact unmanaged customizations on components.

Patching and Deployment

Patching is a crucial aspect of maintaining and updating Managed Solutions. Here’s how you can effectively manage patches:

  • Creating Patches: Patches allow you to make incremental updates to a solution without modifying the entire solution. They include only the changes to entities and related assets.
  • Applying Patches: Patches can be applied to both managed and unmanaged solutions. They must have the same major and minor version numbers as the parent solution but a higher build and release number.
  • Cloning Solutions: When you need to roll up all patches into a new version, you can clone the solution. This creates a new version that includes all the patches, ensuring a clean and updated deployment.

Conclusion

Navigating the complex world of Microsoft CRM Managed Solutions requires a comprehensive approach. By understanding the core components, leveraging Solution Layers, and staying updated on the latest changes related to Power Apps, businesses can ensure a smooth and efficient customization deployment in their CRM environments. Always exercise caution and follow best practices, especially when updating solutions, managing dependencies, or overwriting customizations. The power to tailor CRM environments to specific needs lies with those who master the nuances of Managed Solutions and their evolving capabilities.

Additional Recommendations: Use a single publisher for all solutions across environments.

Mastering Dependency Injection in C# and ASP.NET Web API: A Comprehensive Guide

Hey there! 👋 Let's dive into Dependency Injection (DI) in a way that actually makes sense. No buzzwords, just practical knowledge you can use today.

Why Should You Care About DI?

Before we dive into the code, let's talk about why DI matters in real-world development:

  • Ever inherited a codebase where changing one thing breaks everything else?
  • Spent hours mocking dependencies for unit tests?
  • Struggled to swap implementations for different environments?

DI helps solve these headaches. Let's see how.

Starting Simple: The Basics

Let's build this up step by step with a real-world scenario. Imagine you're building an e-commerce API:

// Before DI - The Painful Way 😫 public class OrderController { private readonly OrderService _orderService = new OrderService( new PaymentProcessor( new PaymentGateway() ) ); } // After DI - The Clean Way 😎 public class OrderController { private readonly IOrderService _orderService; public OrderController(IOrderService orderService) { _orderService = orderService; } }

Real-World DI Patterns

The Constructor Injection Pattern (Your Go-To Choice)

This is what you'll use 90% of the time:


public class OrderProcessor { private readonly IPaymentGateway _paymentGateway; private readonly IOrderRepository _orderRepository; private readonly ILogger<OrderProcessor> _logger; public OrderProcessor( IPaymentGateway paymentGateway, IOrderRepository orderRepository, ILogger<OrderProcessor> logger) { _paymentGateway = paymentGateway; _orderRepository = orderRepository; _logger = logger; } public async Task ProcessOrder(Order order) { _logger.LogInformation($"Processing order {order.Id}"); // Your business logic here } }

Service Lifetimes Explained Simply

Think of services like employees in a store:

public void ConfigureServices(IServiceCollection services) { // The Store Manager (Singleton) - One person, there all day services.AddSingleton<IStoreConfig, StoreConfig>(); // The Cashier (Scoped) - One per customer services.AddScoped<IOrderProcessor, OrderProcessor>(); // The Shopping Assistant (Transient) - New one for each task services.AddTransient<IProductValidator, ProductValidator>(); }

Testing Made Easy

Here's how DI makes testing a breeze:

public class OrderProcessorTests { [Fact] public async Task ProcessOrder_WithValidPayment_Succeeds() { // Arrange var mockPaymentGateway = new Mock<IPaymentGateway>(); mockPaymentGateway.Setup(x => x.ProcessPayment(It.IsAny<decimal>())) .ReturnsAsync(true); var processor = new OrderProcessor( mockPaymentGateway.Object, Mock.Of<IOrderRepository>(), Mock.Of<ILogger<OrderProcessor>>() ); // Act await processor.ProcessOrder(new Order { Amount = 100m }); // Assert mockPaymentGateway.Verify(x => x.ProcessPayment(100m), Times.Once); } }

Advanced Patterns (When You Need Them)

The Decorator Pattern (Adding Behavior)

Perfect for adding caching, logging, or validation:

public class CachingOrderService : IOrderService { private readonly IOrderService _inner; private readonly ICache _cache; public CachingOrderService(IOrderService inner, ICache cache) { _inner = inner; _cache = cache; } public async Task<Order> GetOrder(int id) { var cacheKey = $"order_{id}"; if (_cache.TryGet(cacheKey, out Order order)) return order; order = await _inner.GetOrder(id); _cache.Set(cacheKey, order); return order; } }

Factory Pattern (When You Need Dynamic Creation)


public class PaymentProcessorFactory { private readonly IServiceProvider _services; public PaymentProcessorFactory(IServiceProvider services) { _services = services; } public IPaymentProcessor Create(PaymentMethod method) { return method switch { PaymentMethod.CreditCard => _services.GetRequiredService<ICreditCardProcessor>(), PaymentMethod.PayPal => _services.GetRequiredService<IPayPalProcessor>(), _ => throw new NotSupportedException($"Payment method {method} not supported") }; } }

Common Pitfalls (Learn From Our Mistakes)

❌ Circular Dependencies


// Don't do this! public class ServiceA { public ServiceA(ServiceB b) { } } public class ServiceB { public ServiceB(ServiceA a) { } } // Do this instead public class ServiceA { private readonly IServiceProvider _services; private ServiceB _b; public ServiceA(IServiceProvider services) { _services = services; } private ServiceB B => _b ??= _services.GetRequiredService<ServiceB>(); }

❌ Disposing Services Incorrectly

// Remember to dispose scoped services! public async Task ProcessOrders() { using var scope = _services.CreateScope(); var processor = scope.ServiceProvider.GetRequiredService<IOrderProcessor>(); await processor.ProcessPendingOrders(); }

Pro Tips 🚀

  1. Keep services focused (Single Responsibility Principle)
  2. Use constructor injection by default
  3. Register services in feature modules for better organization
  4. Always dispose of scoped services
  5. Use middleware for cross-cutting concerns

Wrapping Up

DI isn't just a pattern – it's a tool that makes your life easier. Start with constructor injection, use scoped services wisely, and remember: if a class needs to create its dependencies, it's probably doing too much.

Tuesday, January 2, 2024

Resolving CRM Online LINQ Query Failures: A Deep Dive into a Strange SQL Error

Introduction: In the world of Microsoft Customer Relationship Management (CRM) online systems, encountering errors during LINQ queries can be a frustrating experience. Recently, our team faced a particularly perplexing issue where a LINQ Query failed, throwing an enigmatic SQL error. The error message provided little information, leaving us scratching our heads. In this blog post, we’ll share our journey in troubleshooting and ultimately resolving this issue.

The Error: Here’s the error message that had us stumped:

{
"Message": "An error has occurred.",
"ExceptionMessage": "Sql error: Generic SQL error. CRM ErrorCode: -2147204784 Sql ErrorCode: -2146232060 Sql Number: 207",
"ExceptionType": "System.ServiceModel.FaultException`1[[Microsoft.Xrm.Sdk.OrganizationServiceFault, Microsoft.Xrm.Sdk, Version=9.0.0.0, Culture=neutral, PublicKeyToken=31bf3856ad364e35]]"
}

Initial Investigation: Our first step was to reach out to the Microsoft support team for assistance. After providing them with the network trace and Fiddler log, they uncovered an interesting lead — an error related to customer insight fields. Intrigued, we dove deeper into our CRM system.

Discovery: Upon scrutinizing the CRM fields and relationships, we discovered that the mentioned fields did exist, but here’s the catch — they were no longer in use. Puzzled by this revelation, we recalled a past instance where we had created a customer insight instance for testing purposes. Subsequently, we reset (deleted) it using Microsoft’s recommended method.

However, it seems that not everything was cleanly deleted. Some fields and relationships lingered behind, causing a ripple effect leading to the LINQ Query failure.

Bug Identified: This anomaly in the deletion process hinted at a bug related to the interaction between customer insights and CRM links. It became apparent that when encountering the cryptic SQL error mentioned earlier, the first course of action should be to check for unused fields or relationships.

Resolution: Armed with this knowledge, we undertook a systematic cleanup process. We meticulously combed through our CRM system, identifying and deleting any remnants of fields or relationships that were no longer in use. Once this cleanup was completed, we re-executed the LINQ Query, and lo and behold, the error vanished.

Conclusion: The journey from a vague SQL error to a resolution taught us the importance of thorough system cleanup, especially when dealing with interconnected modules like customer insights and CRM. If you ever encounter a LINQ Query failure with a similar error, consider this blog post as your guide to troubleshooting and resolving the issue.

Remember, the devil is in the details — sometimes, the remnants of past testing can come back to haunt your queries. Happy coding

Sri Lanka .NET 
                Forum Member